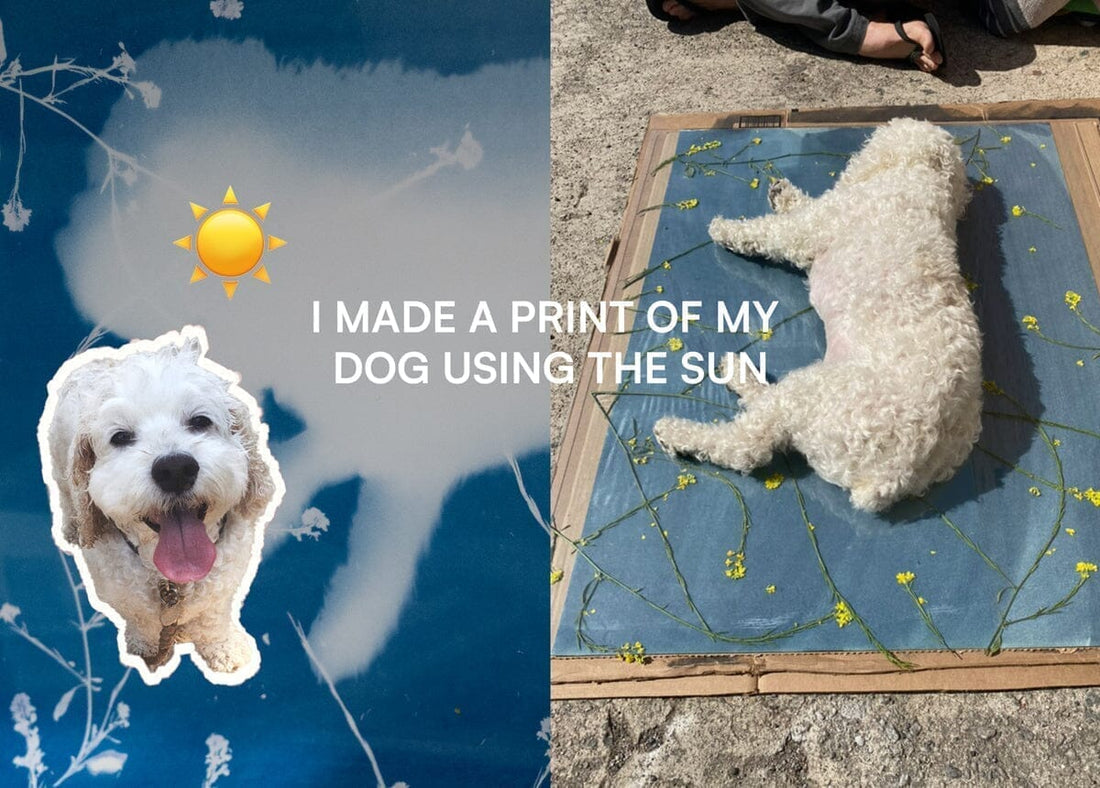
What if I told you the sun could develop photographs of your pet—and you don't need a camera to do it? Pretty wild right? I wanted to create a keepsake of my dog Bacon and thought a cyanotype would be perfect – not for photographic accuracy, but to capture his aura. The process was simple: just Bacon, sunlight, and light-sensitive paper. The sun turned the exposed areas of the paper blue while his body blocked the light, leaving a white silhouette against a deep blue background. There was something poetic about using the same sunlight that lit up our adventures over the years to capture his essence forever.
Prior to creating my Bacon cyanotype I was familiar with small-scale DIY projects, like botanical prints. While looking for large-scale prints, I came across works by Susan Weil and Rauschenberg from their time at Black Mountain College. They had models lay on photosensitive fabric with sprigs of foliage while they moved a light around indoors to develop the emulsion. The results were dreamlike – a reproduction of figures in kaleidoscopic foliage that seemed to float between reality and reverie.
 I also found Eric William Carroll's work. He makes large-scale field recordings of trees and bushes, but instead of straight photographic representation of plants, his outcomes are more abstract, soft and ephemeral.

Inspired, I came up with a list of materials I needed for the project.
Material list 🎨
- Jacquard Cyanotype Sensitizer Set
- Foliage
- Watercolor paper (see below*)
- Wide flat brush (around 4” like this or this)
- Glass (see below*)
- Towels
- Cardboard
- Plastic container (wide enough to fit the brush)
- Measuring cup

* Watercolor Paper: You'll want to use either hot or cold press watercolor paper (medium weight works best). Avoid rough paper as you may lose detail with textured paper. I used 25" x 35" for my 19-pound cockapoo (similar in size to a schnauzer or beagle), but feel free to choose a size appropriate for your pet. The goal is to have enough space around your dog to arrange the flowers nicely. Arches paper is excellent quality with beautiful deckle edges, but Blick brand works well too and is more affordable.
* Glass: I recommend picking up a regular sheet of glass from Home Depot rather than using plexiglass. Glass allows UV light to pass through more clearly, which is important for the process. The glass should be the same size or slightly larger than your paper.

Step-by-step instructions 📝
1. Prepare Your Workspace:
-
Work in a dimly lit room or use red/amber lighting. UV light will start the chemical reaction. Avoid bright lights and sunlight.
2. Mix the Sensitizer:
- In the plastic container, mix equal parts Solution A and Solution B from your Jacquard kit
- Mix only what you'll use immediately. The solution doesn't store well once combined
3. Coat Your Paper
- Place cardboard underneath your paper to protect your work surface
- Use the brush to apply the mixed solution evenly across the paper (one layer is enough).
- The paper should be damp but not soaking wet
- Let it air dry in the dark (it will turn yellow-green when dry)
4. Arrange Your Design
- Place your objects (flowers, leaves, etc.) directly on the coated, dry paper
- Arrange them how you want them to appear in the final print
- Cover with glass to keep everything flat and in contact with the paper
5. Expose to UV Light
- Take your setup outside into direct sunlight, including the cardboard underneath (this protects the paper from damage, especially on rough surfaces)
- Have your dog lie in the center of the glass (still covering the paper)
- Exposure time varies: 2-5 minutes in bright summer sun, 5-10 minutes in moderate sun
- You'll see the paper turning blue around your dog. The covered areas stay lighter
- Cover the entire setup immediately with a towel after exposure to prevent further light exposure of the paper while transporting it indoors
6. Rinse and Develop
- Remove the objects (flowers, leaves, etc) and rinse the paper in cool running water. I rinsed it in the bathtub
- The unexposed areas will wash away, leaving white/light areas
- Continue rinsing until the water runs clear
- The blue will intensify during rinsing
7. Dry Your Print
-
Hang or lay flat to air dry

What started as a simple DIY project became something deeper. Watching Bacon's silhouette emerge against that rich indigo blue, I realized I wasn't just making a print, I was creating a permanent record of our time together.
Bacon passed away a month later from hemangiosarcoma, and now when I look at the framed piece, I see it all: lazy Sunday mornings, naps in the sunniest spot in the house, the way he'd stop to sniff every flower and leaf during our long walks. The scattered blooms and his soft silhouette in the print remind me of those quiet moments we shared.
If you're thinking about making your own pet cyanotype, just go for it! It isn't about getting everything perfect, it's in the unexpected beauty and meaning that emerges in the process.
If you found this tutorial helpful and tried making your own cyanotype, tag us on Instagram @blink.things. We’d love to see your print!

Frequently Asked Questions🤔
Will it stain my bathtub? No, the cyanotype solution rinses clean from porcelain and most other surfaces.
My print has long shadows. Is this normal? Yes, embrace it! Long shadows add character to your print. For crisper outlines with minimal shadows, expose at noon when the sun is directly overhead.
Can I still print on overcast days? Absolutely! It just takes longer. Expect 15-30 minutes on overcast days compared to 2-5 minutes in bright sun.
How many Jacquard kits do I need? One kit provides enough solution to make several 25" x 35" prints.
Can I do this indoors? If you have a sunroom with direct overhead light, yes! For regular windows, keep in mind the angled sunlight will create a shadow effect around your dog.
Can I reuse the mixed solution? No, once you mix solutions A and B together, use it immediately. The combined solution doesn't store well and loses effectiveness quickly. If you have leftover solution, you can apply it on the paper and store it in a dark, dry place for later use.
What if my dog won't stay still? Choose a calm, safe, and comfortable spot for your dog. Schedule the exposure during nap time or after a walk when they're naturally tired and relaxed. Remember, slight movement can create beautiful blur effects, so don't stress if your pup shifts a little!
My print came out too light/dark. What went wrong? Too light = not enough exposure time or weak UV light. Too dark = overexposed. Do a test strip first to find your perfect exposure time.
My paper curled after drying. How do I flatten it? Place the dried print under heavy books for a few days to flatten it out.
How do you make the flowers look more soft? If you want a softer, more ethereal effect, try placing some flowers above the glass. The slight movement of the flowers in the wind during exposure will create a beautiful, dream-like blur effect.
How do you make the flowers look more sharp? Any flowers or leaves placed directly under the glass will turn out sharp. Fresh flowers work better than dried ones for crisp details.